How to setup FreePPP
 FreePPP Setup
  FreePPP
Install Instructions:
The archive 'free-ppp-25v2.hqx' contains the following files:
- Install FreePPP2.5v2 (Installer application)
- FreePPP Monkey Data 1 (Installer data file)
Double click Install FreePPP2.5v2 and choose Install. You will then presented with options of the drive to install on, and to Easy Install or Custom Install.
- Easy Install will install all the necessary things for you to use FreePPP.
- If you choose to use Custom Install make sure you install FreePPP and FreePPP Setup, these are the 2 necessary components of FreePPP.
The folder Internet Applications will be placed just inside the selected harddrive. It will contain FreePPP Setup and the documentation. FreePPP will be placed in the Extensions folder.
Install FreePPP2.5v2 will restart your computer after installing FreePPP so that it is available.
This setup file is not a be all and end all, read the documentation for FreePPP that is installed with it if you want to learn more.
Configuring FreePPP
Open FreePPP Setup and configure it as follows:
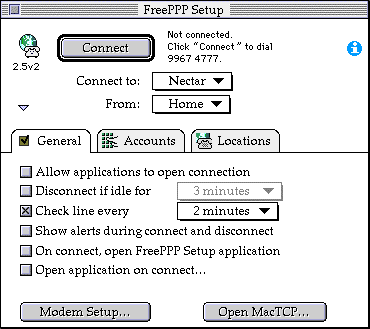
- Click on the blue triangle to expose the bottom section of the window.
- Unselect Allow applications to open connection. This will stop FreePPP trying to connect when you are not connected and have opened a client program.
- Selecting Check line every will tell FreePPP to check the line every so often, and realise if you have been disconnected.
Modem Setup...
Click on Modem Setup... and setup the following.
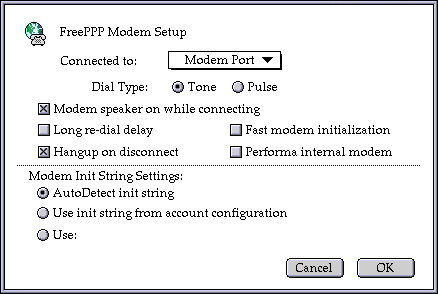
- Set Connect to: to the port your modem is connected to.
- Unless you have a strange modem AutoDetect init string is the best option to select. Otherwise you will need to consult your modem manual for the correct init string.
- Remember to click OK when you have finished setting these so that it is saved.
Accounts
Select the Accounts tab, then select the 'Untitled' setup and click Edit... to open the Account options.
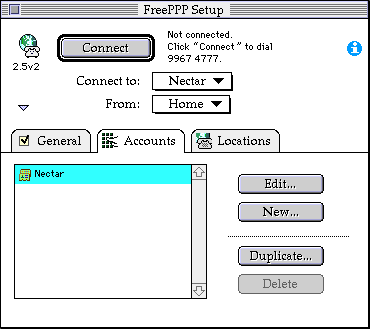
Account options
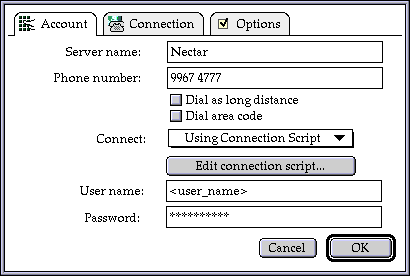
- Set the Server name: to Nectar.
- Set the Phone number: to 9967 4777.
- Change Connect: to Using Connection Script.
- Set the User name: and Password: fields to your own.
These will replace the '/A' and '/P' in the script.
If you leave eithor field blank FreePPP will ask you to enter the field before it dials.
- Click on Edit connection script... to edit the script.
Login Script
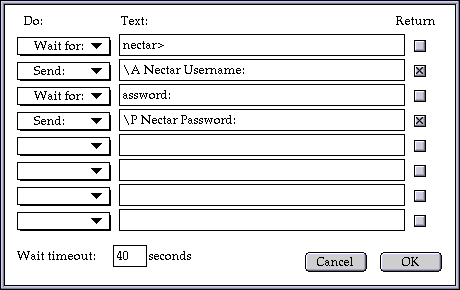
- Fill in the script as above.
- Make sure the Do: and Return fields are set correctly.
- When you have finished setting the script remember to hit the OK button to save it.
Connection options
Select the Connection tab to edit its options.
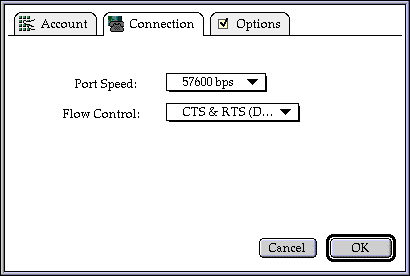
- Port Speed: and Flow Control: will need to be set relative to your modem.
Most current modems support CTS & RTS.
See below for a comparison of Port speed and modem speed.
- Port Speed:
- 14.4 board modem -> 57600 bps
- 28.8 board modem -> 115200 bps
- Flow control:
- CTS -> Clear to sender
- RTS (DTR) -> Ready to send
- Remember to click OK when you have finished setting these so that it is saved.
Options
The Options page preferences are not used in this version of FreePPP, and only appear to show what will be coming in FreePPP.
Locations
Making changes to the Locations preferences is only necessary if you use your computer from more than one location.
You have now finished setting up FreePPP.
To Connect
Once you have finished setting up FreePPP you will want to connect to Nectar.

- Connect your modem to the computer and the phone line. Then turn the modem on.
- Click the Connect button.
- FreePPP will now ask you for your username and/or password if either field has been left blank.
- Then it will dial Nectar and connect.
FreePPP is available on this site in the directory '/pub/mac/system'.
If you think that there is anything missing from this documentation don't hesitate to send suggestions.
Version 2.1.1 (12/2/97)