How to setup Fetch
 Fetch
Fetch
Install Instructions:
You double click on the file Fetch 3.0.1 Installer and at first it opens up an information window. This information is worth at least skimming before clicking Continue.
In the next window you are presented with a number of install options, and high lighting one will display info about that option. Clicking Install will install your chosen option.
- This setup file is not a be all and end all, please also read the Documentation for Fetch, Fetch Help in the menu Windows.
- The installer also contains Internet Config 1.2.
Fetch can be downloaded via this link.
Configuring Fetch
You will need to configure Fetch as follows.
Select New Shortcut... from the menu Customize in Fetch, and you will get the following window.
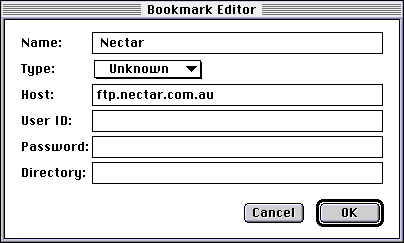
- Set Name: to Nectar & Host to ftp.nectar.com.au.
- You may want to set User ID: to your login name.
- You have now created a short cut to Nectar.
Now you should setup Fetch's Preferences.
The first thing to setup is the General section.
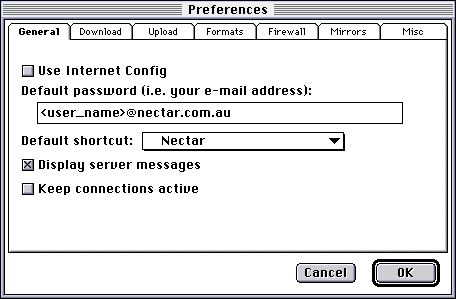
- Replace <user_name> with you login name at Nectar, and remember to put @nectar.com.au after it.
- Setting Default shortcut: to Nectar might be useful.
The next step is setting up Download.
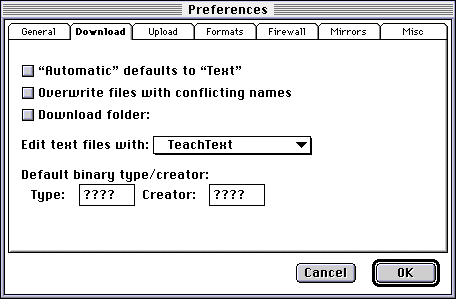
- Deselect "Automatic" defaults to "Text" because if it is selected it can cause some files to be crupted if Fetch doesn't recognise their file type.
- Selecting Download folder will set a default folder that Fetch will download into.
- You might wish to change Edit text files with: to your favourite text editing program.
- It is generaly best to leave Default binary type/creator: as '????' for both.
Upload is the next section setup.
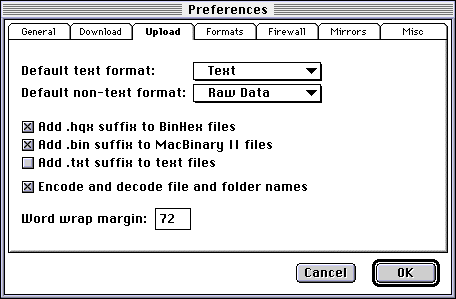
- Setting Default text format: to Text & Default non-text format: to Raw Data are the best options, though you may wish to change this when/if you are more familar with the available options.
- It is best to select Add .hqx... & Add .bin..., but not to select Add .txt..., though these preferences may be changed by your use of the program.
The sections Formats, Firewall & Mirrors do not need to be changed, though it would be worth having a look at them to see what they contain.
The last section you need to setup is Misc.
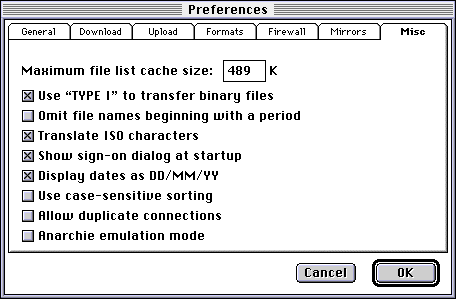
- The only thing that needs to be set on this page is Display dates as....
- The three options that follow it are a matter of personal preference.
Fetch should now be setup correctly.
Opening a New Connection
Select New Connection... from the File menu in Fetch and you will get the following window. If you have set your 'User ID' in the 'New Shortcut' it will appear below. Fill in your password, which will appear as bullets (.), then hit OK and you will be connected to Nectar from within your account directory.
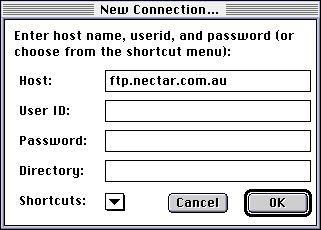
- If the fields User ID & Password are left blank they will be replaced with 'anonymous' & the 'Default password' (your Email address) respectively. This will give you guest access to most sites, though some sites do not allow guest access.
- The list of shortcuts has a number of interesting sites, most of which are in the US.
- A list of Australian archive sites can be found on the page Setup you Mac for the Internet.
Fetch is available on this site in the directory '/pub/mac/ftp'.
If you think that there is anything missing from this documentation don't hesitate to send suggestions.
Version 1.2 (24/1/97)